My Expertise
I am an Applied Data Scientist at causaLens aiming to revolutionise the world of AI by stepping away from
traditional "Correlation" Machine Learning and focusing on the future: causal AI. Previously, I worked as a Data
Scientist developing Machine Learning models for credit decisioning at NewDay. I
completed my Master's in Artificial Intelligence from the University of St Andrews, during which I earned
the all-time top grade in the Machine Learning module with a 99% average and graduated with the
Dean’s List Award. Before my Master’s, I graduated from the University of Bath with a First-Class Honours
degree in Computer Science, which included a 13-month placement as a software engineer in the fast-paced world
of Formula 1 with the Scuderia Toro Rosso team.
My goal is to combine the practical, theoretical and mathematical knowledge that the fields of machine learning
and data science entail in order to develop meaningful and efficient solutions with direct contributions
to real-life problems and to society. As both a data scientist, I truly enjoy digging deep into the data I work
with to truly understand and build the best model possible that can be used in real-life scenarios.
As a software engineer, I truly enjoy fully automated pipelines covered by extensive test suites, well
version-controlled and documented code, analysing the data I'm working with, developing code using state-of-the
art tools and always learning more by exploring different project.
Languages


My main programming languages are Python, Java, web-based languages (JavaScript/HTML/CSS) and SQL. I also have experience programming in C, Bash, GodotScript, Haskell, MATLAB, Swift and Basic (AGKv2).
Frameworks


I have worked with a variety of ML tools such as Scikit-Learn, Pandas, LightGBM, XGBoost, NumPy, Matplotlib, Keras/Tensorflow, PyTorch, Seaborn, OpenCV, NLTK; and general frameworks such as Django, Flask, Boostrap, JQuery, Node.JS, Jekyll, Highcharts, D3.js.
Tools


A few of the tools that I have used on a daily basis include JetBrains IDEs (PyCharm, WebStorm, IntelliJ IDEA), JupyterLab, git (GitHub/BitBucket), Vim, Travis CI, Heroku, and different OS (macOS, Ubuntu, Fedora, Debian, Windows).
Work Experiences
NewDay
Applied Data Scientist
(Oct 2023 - Present)
Revolutionising the world of AI by stepping away from traditional Correlation Machine Learning and focusing on causal AI. Building causal AI-powered solutions for leading organizations across a wide range of industries.
NewDay
Data Scientist
(Feb 2021 - Present)

Building high-performing, stable and explainable ML models applied in credit risk, while leading the development of the team's internal ML library. Ensuring the robustness/relevance of live models. Redefining the team's coding standards/practices.
Scuderia Toro Rosso F1 Team
Software Engineer Placement
(Jul 2017 - Aug 2018)

Developing and stabilising a large web application designed to deliver terabytes of aero simulation data per week, involving robustness improvements and performance optimisation.
Education
University of St Andrews
MSc Artificial Intelligence
(2019-2020)

Graduated with Distinction (88.99%)
Top all-time ML grade (99%)
Dean’s List Award
University of Bath
BSc Computer Science
(2015-2019)

Graduated with First-Class Honours (71.6%)
Lycée Albert 1er
French Scientific Baccalaureate, Option Internationale (2012-2015)

Graduated with Honours
Publications
Large Projects
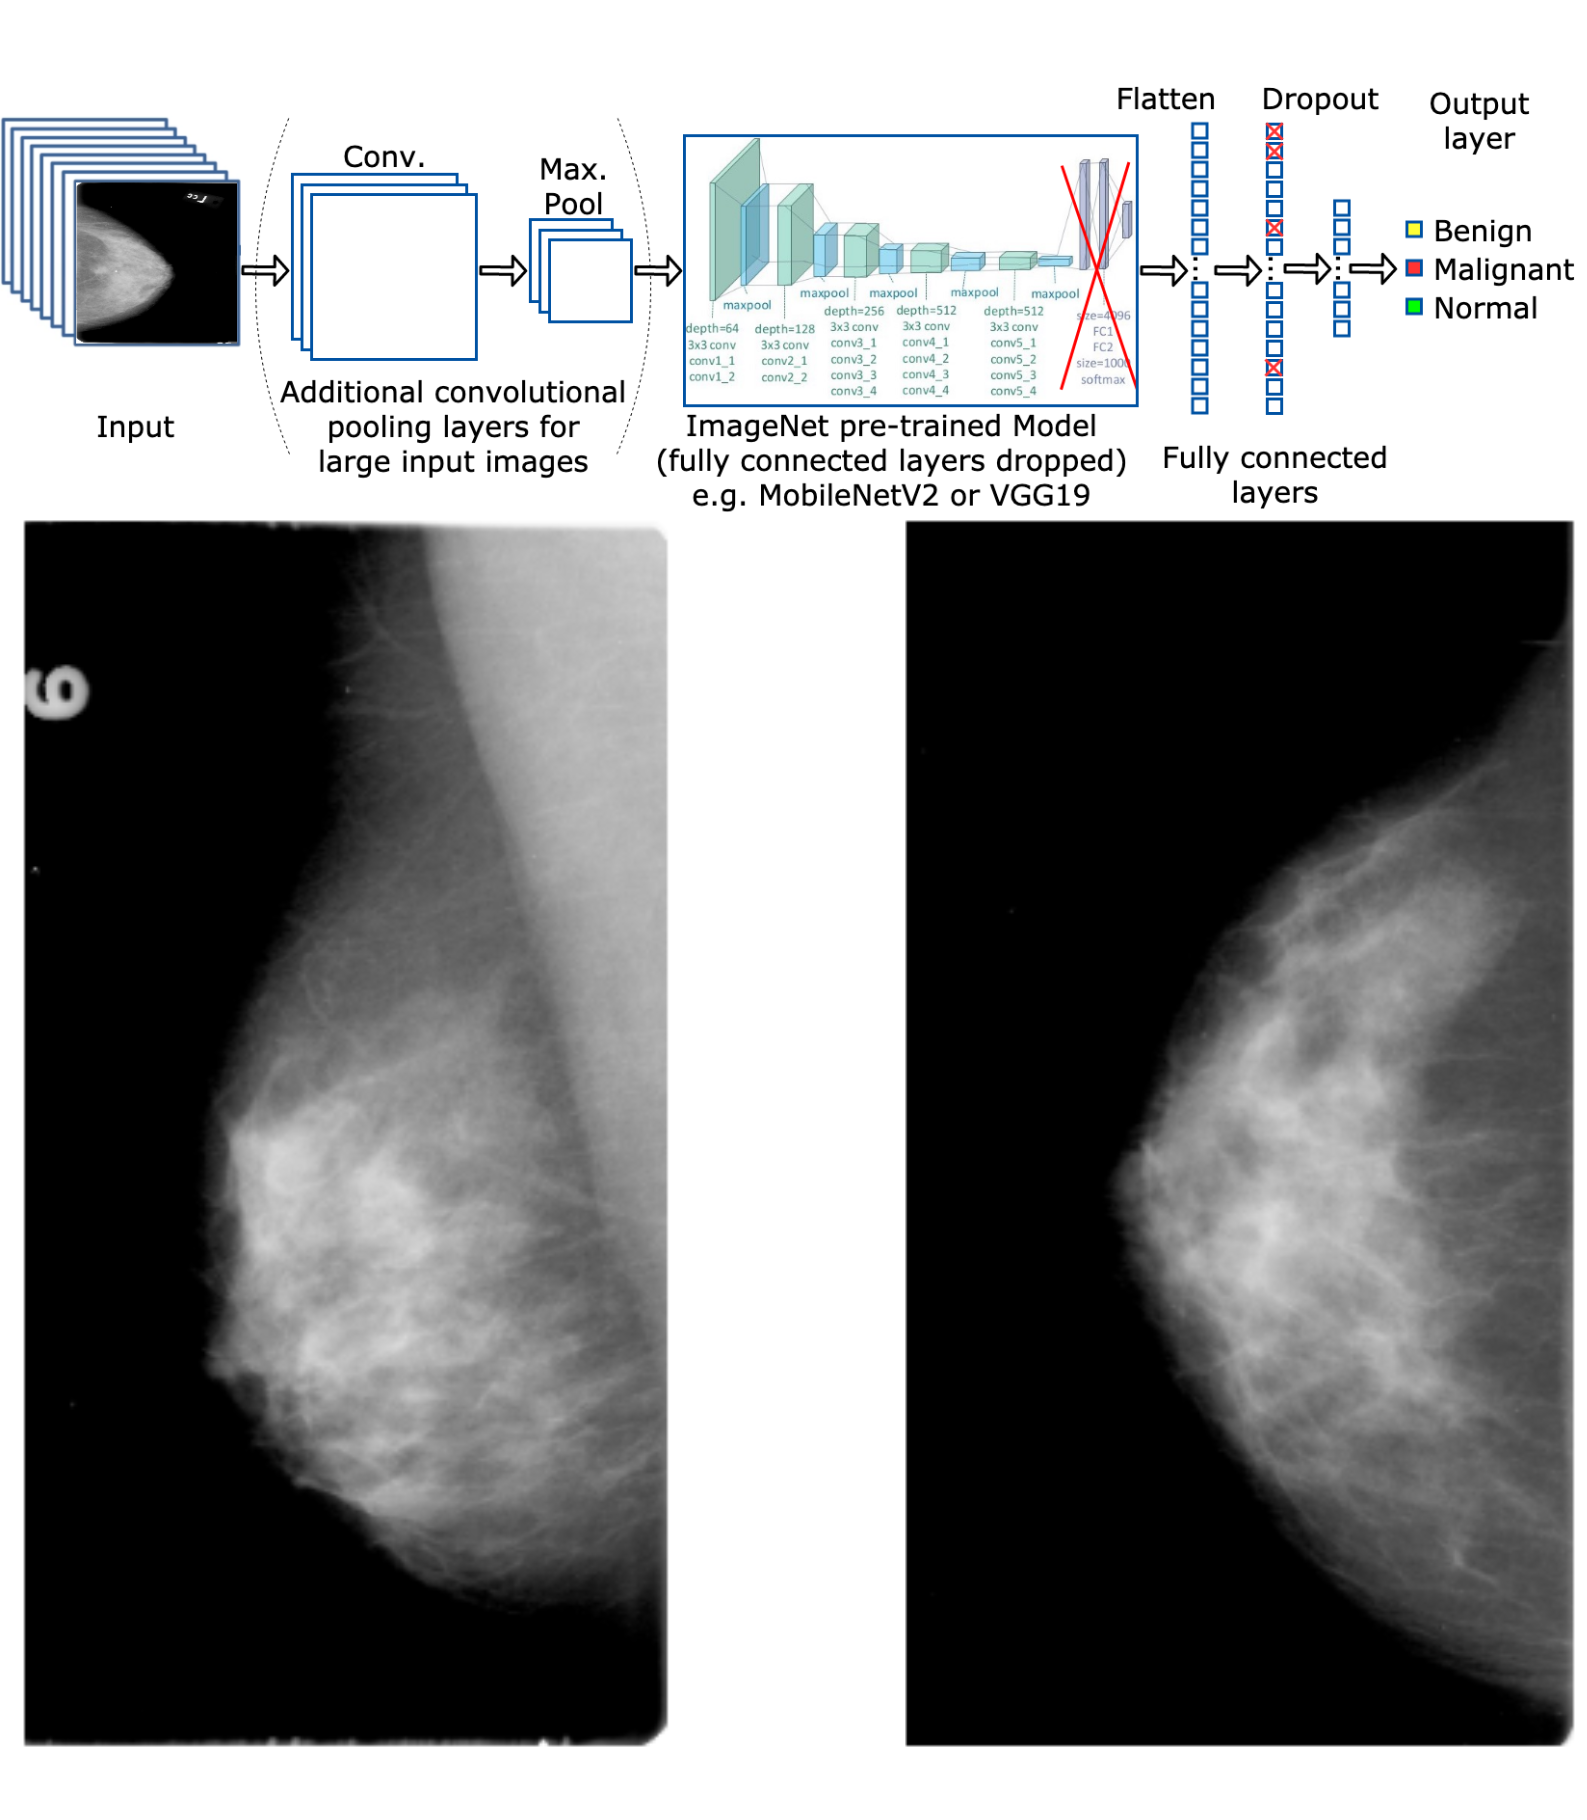
Breast Cancer Detection in Mammograms using Machine Learning techniques (Master's Thesis) Star Fork
My Master's Thesis, where CNNs are used as part of a DL pipeline on the Curated Breast Imaging Subset of DDSM (CBIS-DDSM) dataset. A divide and conquer approach is followed to analyse the effects on performance and efficiency when utilising diverse deep learning techniques such as varying network architectures (VGG19, ResNet50, InceptionV3, DenseNet121, MobileNetV2), class weights, input sizes, image ratios, pre-processing techniques, transfer learning, dropout rates, and types of mammogram projections.
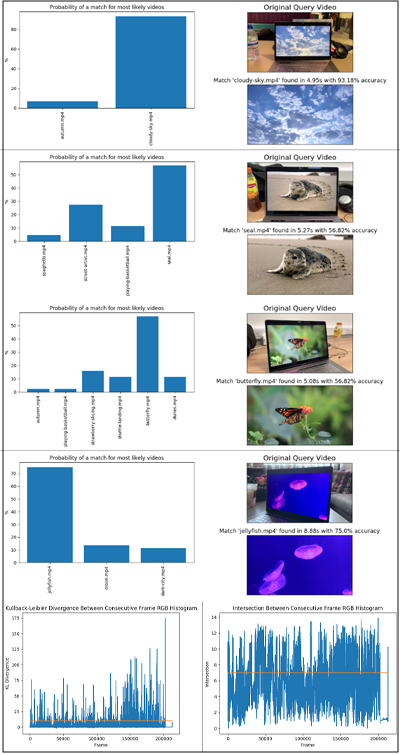
Content-Based Video Retrieval for Pattern Matching Videos (Undergraduate Dissertation) Star Fork
This project presents the design concepts and implementation steps of a content-based retrieval system for videos. It was originally inspired by the famous music-matching mobile application Shazam, with the aim to create a similar system for matching movies. Ultimately, a functional system was built by combining multiple methods into one pipeline and tested with a database of 50 short videos along with various videos recorded through mobile phones, resulting in correct matches reaching accuracies of 93%.

HacK-StacK
HacK-StacK is a web application designed to help people learn the basics of cyber security so they can defend themselves against online threats. Command-line and information security basics are covered through sets of increasingly challenging problems carried out by typing commands directly from the built-in HacK-StacK terminal. The users who complete the most challenges can reach the top of the leaderboards.

FCF Real-Estate Android Application Star Fork
FCF Real-Estate is a catalogue to browse FCF Real-Estate Monaco's properties available for sale & renting. It features a single XML feed for the data, property sorting, system of favourites, a search engine, an offline mode, multiple language support, an HD image gallery and in-app emailing.
Open Source Projects
My Personal Retro Blog
A retro blog built with Hexo and EJS dedicated to my personal hobbies and activities outside of work.
Short-Term Solar Irradiance Forecasting using LSTMs
Predicting short-term solar irradiance using deep learning and statistical methods on the Folsom dataset.
Code in Place 2023
My slides + code solutions to the exercises for the 2023 edition of the Stanford Code in Place online course that I am teaching for.
2D Pixel Platformer Video Game
Building a 2D pixel platformer video game to learn game development. Built using the Godot Engine (3.5).
Trello Card Counter
A Firefox extension that counts the number of cards in each column of any Trello board.
Machine Learning, Data Science & Python Notes
Python code and notes in the form of Jupyter Notebooks useful for general Machine Learning and Data Science projects.
Seal Pup Aerial Imagery Neural Network Classifier
Machine Learning & data visualisation/processing techniques for classifying seal pups from aerial imagery using Neural Networks.
Coronavirus Insights Dashboard
A node.js application deployed on Heroku showing the spread of Coronavirus through visualisations designed in D3.JS.
Predicting Superconductors' Critical Temperatures using Regression
Machine Learning & data visualisation techniques for predicting the critical temperatures of superconductors.
POS Tagger with Unknown Words Handling
Part-of-Speech (POS) tagger for predicting POS tags in sentences from the Brown corpus using the Viberbi algorithm.
Neural Network Ticketing Routing Agent
Ticketing-routing agent using neural networks to learn the data and how to submit new tickets based on optimal hyperparameters.
HTTP Web Server
Implementation of a simple HTTP server in Java, supporting basic HTTP requests, binary images and multithreading.
Flight Route Planner using AI Search
Flight route planning agent using classic AI search algorithms (A*, Best-First, DFS, BFS).
My Portfolio Website
The code for this very website, a one-page mobile-friendly website powered by Jekyll acting as an interactive online CV.
Meal Tracker iOS App
Meal tracker and rating iOS application built in Swift to learn the basics of the iOS programming language.
Formula 1 Crash Statistics Website
Flask web application parsing F1 crash statistics from Wikipedia and displaying them in charts and tables.
Computer Vision: Filtering, Object Recognition & Features
Image matching using intensity-based and feature-based template matching (SIFT) algorithms.
Environment Exploring Rover
A wall-following rover built using a LeJOS EV3, touch sensors and ultrasonic sensors for an intelligent system research project.
Relaxation Technique Parallelised in C
Relaxation technique using POSIX threads (shared memory) and MPI (distributed memory).
AdamouizationFilms Website
One-page mobile-friendly website built with Jekyll and Bootstrap showcasing my online filmmaking projects.
Space Shooter Video Game
A prototype space-shooter video game created in AGK BASIC v2 to learn the basics of game development through a 2D game engine.
Binary Image Classifier
Binary image classifier using Gaussian Mixture Models and computer vision-based feature extraction written in MatLab.
Haskell Text-Based Adventure Game
Text-based adventure game played in the terminal written in a functional way in Haskell.
Top StackOverflow Posts
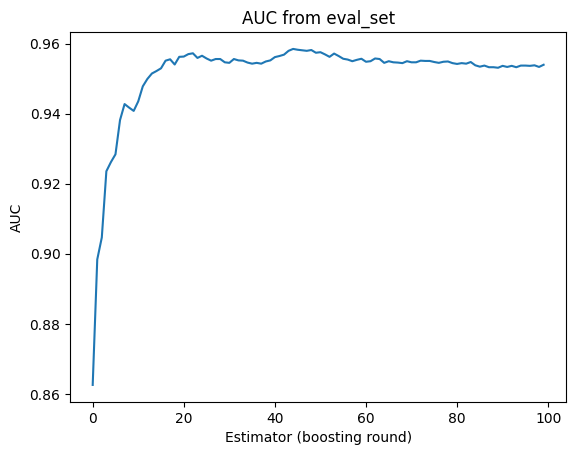
Why does XGBoost prediction have lower AUC than eval of same data in eval_set?
User Question
I am training a binary classifier and I want to know the AUC value for its performance on a test set. I thought there were 2 similar ways to do this: 1) I enter the test set into parameter eval_set, and then I receive corresponding AUC values for each boosting round in model.evals_result(); 2) After model training I make a prediction for the test set and then calculate the AUC for that prediction. I had thought that these methods should produce similar values, but the latter method (calculating AUC of a prediction) consistently produces much lower values. Can you help me understand what is going on? I must have misunderstood the function of eval_set.Here is a fully reproducible example using a kaggle dataset (available here):
import pandas as pd
from sklearn.model_selection import train_test_split
from sklearn.metrics import RocCurveDisplay, roc_curve, auc
from xgboost import XGBClassifier # xgboost version 1.7.6
import matplotlib.pyplot as plt

# Data available on kaggle here https://www.kaggle.com/datasets/uciml/red-wine-quality-cortez-et-al-2009/
data = pd.read_csv('winequality-red.csv')
data.head()

# Separate targets
X = data.drop('quality', axis=1)
y = data['quality'].map(lambda x: 1 if x >= 7 else 0) # wine quality >7 is good, rest is not good

# Split into training and test sets
X_train, X_test, y_train, y_test = train_test_split(X, y, test_size=0.2, random_state=42)

# Create model and fit
params = {
    'eval_metric':'auc',
    'objective':'binary:logistic'
}
model = XGBClassifier(**params)
model.fit(
    X_train,
    y_train,
    eval_set=[(X_test, y_test)]
)
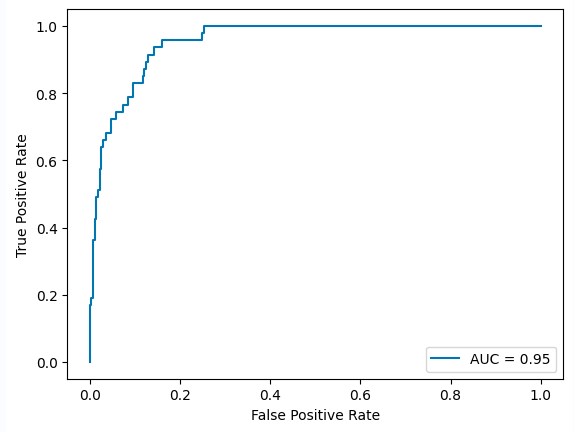
First I visualize the AUC metrics resulting from evaluating the test set provided in eval_set:
results = model.evals_result()
plt.plot(np.arange(0,100),results['validation_0']['auc'])
plt.title("AUC from eval_set")
plt.xlabel("Estimator (boosting round)")
plt.ylabel("AUC")
Next, I make a prediction on the same test set, get the AUC, and visualize the ROC curve:
test_predictions = model.predict(X_test)
fpr, tpr, thresholds = roc_curve(y_true=y_test, y_score=test_predictions,pos_label=1)
roc_auc = auc(fpr, tpr)
display = RocCurveDisplay(roc_auc=roc_auc, fpr=fpr, tpr=tpr)
display.plot()
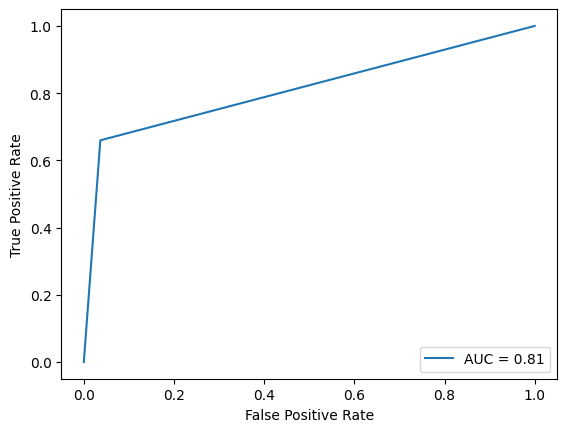 As you can see, the AUC value of the prediction is 0.81, which is lower than any AUC calculated from evaluating
the same test set in eval_set. How have I misunderstood the two methods? Thanks, xgboost is new to me and I
appreciate your advice.
As you can see, the AUC value of the prediction is 0.81, which is lower than any AUC calculated from evaluating
the same test set in eval_set. How have I misunderstood the two methods? Thanks, xgboost is new to me and I
appreciate your advice.
My Answer
XGBoost's eval_results uses predict_proba to calculate the AUC values in your first graph. By using predict, you are getting the predicted class labels, instead of the predicted probabilities, hence the difference you are observing.You should use predict_proba instead of predict:
test_probabs = model.predict_proba(X_test)[:, 1]
fpr, tpr, thresholds = roc_curve(y_true=y_test, y_score=test_probabs, pos_label=1)
roc_auc = auc(fpr, tpr)
display = RocCurveDisplay(roc_auc=roc_auc, fpr=fpr, tpr=tpr)
display.plot()
Output:
Link to StackOverflow question
https://stackoverflow.com/questions/77522478/why-does-xgboost-prediction-have-lower-auc-than-evaluation-of-same-data-in-eval/77522537#77522537How do I detect and fill one pixel gaps in image in python
User Question
I want to take an image that looks like this:
And make it look more like this:

My thinking being you could look a line of 3 pixels and if the left and right most pixel green then fill in the center one, and do the same but with 3 horizontal pixels. run that 3 or 4 times and that would take care of most of it.
My Answer
You can use the OpenCV Python library for this kind of operation.More specifically, you can use morphological transformations, which are available in OpenCV:
Morphological transformations are some simple operations based on the image shape. It is normally performed on binary images. It needs two inputs, one is our original image, second one is called structuring element or kernel which decides the nature of operation. Two basic morphological operators are Erosion and Dilation. Then its variant forms like Opening, Closing, Gradient etc also comes into play. We will see them one-by-one with help of following image.You could use a closing operator, which is:
Closing is reverse of Opening, Dilation followed by Erosion. It is useful in closing small holes inside the foreground objects, or small black points on the object.The result would look something like this:

And the code would look something like this (you would need to load the image and define a kernel):
import cv2
import numpy as np

img = cv2.imread('<path_to_your_image>',0)
kernel = np.ones((5,5),np.uint8)

closing = cv2.morphologyEx(img, cv2.MORPH_CLOSE, kernel)
Link to StackOverflow question
https://stackoverflow.com/questions/73632815/how-do-i-detect-and-fill-one-pixel-gaps-in-image-in-python/73632973#73632973Comparing dictionary key with string
User Question
I'm trying to compare the key in a dictionary with a string in Python but I can't find any way of doing this. Let's say I have:dict = {"a" : 1, "b" : 2}
And I want to compare the key of the first index in the dictionary (which is "a") with with a string. So something like:
if 'Dictionary key' == "a":
return True
else:
return False
Is there a way of doing this? Appreciate all the help I can get.
My Answer
Python dictionnaries have keys and values accessed using those keys.You can access the keys as follows, your dict key will be stored in the key variable:
my_dict = {"a" : 1, "b" : 2}
for key in my_dict:
print(key)
This will print:
a
b
You can then do any comparisons you want:
my_dict = {"a" : 1, "b" : 2}
for key in my_dict:
if key == "a":
    return True
else:
    return False
which can be improved to:
my_dict = {"a" : 1, "b" : 2}
print("a" in my_dict.keys())
You can then access the values for each key in your dict as follows:
my_dict = {"a" : 1, "b" : 2}
for key in my_dict:
print(my_dict[key])
This will print:
1
2
I suggest you read more about dictionaries from the official Python documentation: https://docs.python.org/3.6/tutorial/datastructures.html#dictionaries
Link to StackOverflow question
https://stackoverflow.com/questions/50018955/python-comparing-dictionary-key-with-stringDetecting year in list of strings
User Question
I have list of strings like this:words = ['hello', 'world', 'name', '1', '2018']
I looking for the fastest way (python 3.6) to detect year "word" in the list. For example, "2018" is year. "1" not. Let's define the acceptable year range to 2000-2020.
Possible solution: check if the word is number ('2018'.isdigit()) and then convert it to int and check if valid range.
What is the fastest way to do it in python?
My Answer
You can build a set of your valid years (as strings). Then loop through each of the words you want to test to check if it is a valid year:words = ['hello', 'world', 'name', '1', '2018'] valid_years = {str(x) for x in range(2000,2021)} for word in words: if word in valid_years: print word
As Martijn Pieters mentioned in the comments, sets are the fastest solution for accessing items with an O(1) complexity:
Sets let you test for membership in O(1) time, using a list has a linear O(length_of_list) costAs you can see in the comments, there are a lot of different ways of generating the set of valid_years, as long as your data structure is a Set you will have the fastest way of doing what you want.
You can read more here:
- List comprehension
- Sets
- Complexities for different Python data structures(so you can understand which data structures in Python are quicker for specific operations)
Link to StackOverflow question
https://stackoverflow.com/questions/49895321/detecting-year-in-list-of-stringsHow to customize database connection settings' timezone in django?
User Question
I am looking into django db backends. I have found that datetime values' timezone are changed to and forth by django, while saving dates into db as well as retrieving them. During this conversion process, django uses database connection's timezone settings.I have seen that by default for sqlite db, 'UTC' is the timezone. I want to change the database connections options, during the start of django application. How can I do that ?
Thanks in advance.
My Answer
From the official Django documentation:When support for time zones is enabled, Django stores datetime information in UTC in the database, uses time-zone-aware datetime objects internally, and translates them to the end user’s time zone in templates and forms.
Time zone support is disabled by default.
Because time zone support if disabled by default, you need to manually specify that you want Django to support it. You can do so in your settings.py: For example, if you want UTC +1, then use:
# enable time zone support
USE_TZ = True

# select a timezone
TIME_ZONE = 'Europe/Rome'
Quotes were found from the official Django documentation, which you can access here. I strongly recommend having a read, their documentation is really clear/useful.
Also, if you need other time zones, here is a list of all usable time zones you could use here, which I found from this post.
Link to StackOverflow question
https://stackoverflow.com/questions/49259661/how-to-customize-database-connection-settings-timezone-in-djangoDjango TestCase: recreate database in self.subTest(...)
User Question
I need to test a function with different parameters, and the most proper way for this seems to be using the with self.subTest(...) context manager.However, the function writes something to the db, and it ends up in an inconsistent state. I can delete the things I write, but it would be cleaner if I could recreate the whole db completely. Is there a way to do that?
My Answer
Not sure how to recreate the database in self.subTest() but I have another technique I am currently using which might be of interest to you. You can use fixtures to create a "snapshot" of your database which will basically be copied in a second database used only for testing purposes. I currently use this method to test code on a big project I'm working on at work.I'll post some example code to give you an idea of what this will look like in practice, but you might have to do some extra research to tailor the code to your needs (I've added links to guide you).
The process is rather straighforward. You would be creating a copy of your database with only the data needed by using fixtures, which will be stored in a .yaml file and accessed only by your test unit.
Here is what the process would look like:
- List item you want to copy to your test database to populate it using fixtures. This will only create a db with the needed data instead of stupidly copying the entire db. It will be stored in a .yaml file.
- In your test unit, import your generated .yaml file as a fixture and your test will automatically use this the data from the fixture to carry out the tests, keeping your main database untouched.
generate.py
django.setup()
stdout = sys.stdout

conf = [
{
    'file': 'myfile.yaml',
    'models': [
        dict(model='your.model', pks='your, primary, keys'),
        dict(model='your.model', pks='your, primary, keys')
    ]
}
]

for fixture in conf:
print('Processing: %s' % fixture['file'])
with open(fixture['file'], 'w') as f:
    sys.stdout = FixtureAnonymiser(f)

for model in fixture['models']:
    call_command('dumpdata', model.pop('model'), format='yaml',indent=4, **model)
    sys.stdout.flush()

sys.stdout = stdout
test_class.py
from django.test import TestCase

class classTest(TestCase):

fixtures = ('myfile.yaml',)

def setUp(self):
    """setup tests cases"""
   # create the object you want to test here, which will use data from the fixtures

def test_function(self):
    self.assertEqual(True,True)
    # write your test here
Link to StackOverflow question
https://stackoverflow.com/questions/46099343/django-testcase-recreate-database-in-self-subtest/46099994#46099994Recommended Readings
 Hands-On Machine Learning
Aurélien Géron
 AI: A Modern Approach
Stuart Russell & Peter Norvig
 Clean Code
Robert C. Martin